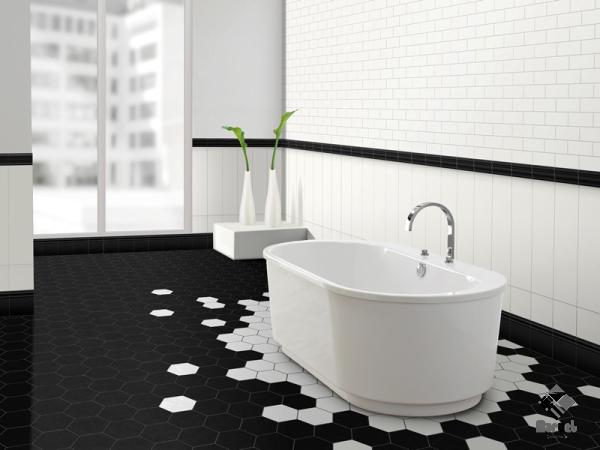
Impress your guests as they enter your home with top entryway designs. the ceramic tile in this significant area of the house can make a huge difference and bring your house a sense of luxury and grandeur. Ranging From wood-look wall tiles to capture mid-century modern style from the front door to geometric marble floor tiles to create a dramatic black-and-white foyer, these tile patterns are the perfect entryway inspiration for any home style! Ideas for Ceramic Tile Entryway Ceramic tile is an excellent flooring, countertop, and shower material. If you are seeking for concepts regarding ceramic tile entryways, scroll down.  Recently, ceramic tile entryways have been increasingly popular, so we’ve chosen to offer some advice to assist homeowners develop their own distinctive style. From selecting the ideal size to incorporating color, our ceramic tile offerings will change your house. Simple Porcelain Tile Entrances We appreciate the clean style and timeless beauty of ceramic tiled entryways. You may easily accomplish this appearance by combining various white tones with darker hues. Use little tiles as accents around the space. Entryways with Dark and Bright Ceramic Tiles Here we have two entrances with dark and brilliant ceramic tile. The combination of black, white, gray, and orange creates a beautiful and contemporary design. We believe that these would work nicely in a room where a contrast between the floor and wall is desired. Dark and Brilliant Ceramics… Ceramic Tile Ceramic tiles are an excellent option for any type of flooring, including door-specific tiles. These tiles are sturdy, simple to install, and available in an array of colors. You can design them yourself or have a local shop do it for you. If you decide to have your own bespoke designs manufactured, you should investigate the various types of glazes before making a final decision. Certain types of flooring may not be compatible with certain glazes due to their varying stain-resistance. Most expert tile stores have significant knowledge about glaze options, but if you already know the sort of flooring you wish to install.
  Here are 10 options for entryways using ceramic tile:
- Use darker hues for the lower portion of the door and softer hues for the upper half.
- Add a modest quantity of gray to a tile of white color.
- Combine two different colors of blue for a stylish appearance.
- Create a pattern using various green and yellow tones.
- Experiment with various shades of brown, cream, and tan.
- Select a brilliant red tile to make a striking statement.
- Return to the fundamentals with black and white tiles.
- Include a touch of orange or pink.
- Bring the blues into your home with blue-and-white tiles.
- Keep things simple with a monochromatic style consisting of only one color tone.
Not only is tile often used for flooring and bathroom surfaces, but it is also becoming increasingly popular for interior design projects such as kitchen countertops, backsplashes, shower surrounds, fountains, fireplaces, and mantels, among others. Ceramic tiles are incredibly resilient, resilient, and low maintenance. They exist in numerous forms, sizes, hues, and patterns. There are a number of methods for installing ceramic tile, including tiling over existing hard floors and walls, utilizing adhesive, and setting in concrete. Overlaying Existing Floor and Wall Surfaces When putting tiles over existing hard surfaces, use spacers to keep the grout even with the tile’s margins. If there is no place for spacers, take meticulous measurements and grout accordingly. You can use a drywall spacer, a piece of plywood, or even backing board. Use a grout float or putty knife to spread grout evenly around each tile while grouting between tiles.  Utilize a damp sponge to remove extra grout from the tile. Once the grout has dried, thoroughly clean the tile with water and allow it to dry fully. Utilizing Adhesive When space is limited, adhesives are ideal for placing ceramic tile on walls and floors. A tile adhesive of high grade should function effectively with both flat-faced and bullnose tiles. using an adhesive, seal the grout in the tile installation area with an adequate amount of grout sealant. Apply the tile to the wall or floor, leaving a 1/8-inch space between the tile’s surface and the underlying surface. Allow the tile to cure for a full night before grouting. After curing, wipe the tile with a moist cloth to remove any leftover grout residue. Creating In Stone Concrete is frequently utilized to install tile in larger, more spacious areas. Mix the cement according to the manufacturer’s directions. Prepare your grout for application according to the product’s instructions. Mix the cement according the manufacturer’s instructions (not mortar). Using a 4-inch trowel, apply cement in the tile’s middle. Tap the cement with the trowel to evenly spread it across the entire area. Tap again to evenly distribute the cement. Repeat the instructions until the cement reaches the tile’s perimeter. Give the mixture 24 hours to dry out. After the cement has dried, fill the voids around the perimeter with extra cement to form a sturdy base. The remaining space should be filled with sand. Apply a thin coating of cement on the tile. Position the tile and press it firmly into the cement. Give the cement 48 hours to dry out. Before staining or painting, remove the tile and allow it to completely cure.
  Keeping Ceramic Tiles Clean After the tile has been placed, it can be cleaned immediately. To remove loose dirt from a surface, brush it using a soft brush or sponge. Use a toothbrush to clean under the tiles and remove debris from behind them. Next, spritz the tile with a solution of equal parts warm water and vinegar. Allow the tile to soak for 15 minutes in the cleaner. Utilize a rag soaked in warm water to clean the tile. Rinse the rag often while wiping to avoid soap scum formation. Towel-dry and polish the tile with a clean cloth. If your tile has been exposed to moisture or is still wet from installation, you may wish to soak it in household bleach for 10 minutes prior to cleaning. Continue cleaning the tile according to the directions above.
Ceramic tile entryway
We wanted to design a stunning environment of entryway made of ceramic tile for our customers’ new home that reflected their taste for a contemporary and uncluttered aesthetic. Our team of designers collaborated to produce a cutting-edge and contemporary foyer for our building. They wanted to make the entryway look classy and sophisticated without sacrificing any of its practicality. The flooring, fixtures, lighting, cabinetry, and hardware were all custom ordered so that they would complement the proportions of the home and its overall design. The floor and wall treatments were used in order to impart a sense of character into the room while also preserving a monochromatic color scheme. This project is a fantastic illustration of how our collaboration can deliver outcomes of the highest possible quality. Keep an eye out for our many upcoming projects, we have a lot in the works! The quality of the tiles and grout in your home can have a significant impact on how clean your home seems to guests. In point of fact, many individuals in today’s society prefer ceramic tiles made of natural stone to the more traditional ones made of ceramic. Furthermore, natural stone tiles are no longer only used for flooring in kitchens. If you want the look of these tiles to be as good as it possibly can be, make sure that the grout that is in between them is thoroughly sealed (as well as any cracks). That way, dirt and moisture won’t be able to seep in where you don’t want them to, which will prevent them from looking beautiful and instead make them look dirty.  If you have a grout sealer, you may execute this step by yourself. Simply combine it with some water, spread it over the grout lines, and then wait for it to dry. After that, use a damp cloth to remove any excess, leaving just enough to fill in any spaces that were left. The utilization of tile cleaners is also another available choice. If you decide to go this way, you must, however, get a floor cleaner that is of professional quality and will not damage your flooring. When purchasing tile cleaning goods from an internet retailer, it is important to carefully read the directions and implement them in their entirety. If you do this, you will reduce the risk of causing harm to your flooring. As a final step, before you place your new tile, give yourself some extra time to make sure that everything looks just right. Chalkboard paint can be used to draw attention to any fissures or faults in the surface. Because of their stunning appearance and luxurious feel, ceramic tiles have become an extremely popular choice for flooring among homeowners. Tiles made of ceramic can be found in a wide variety of forms, some of which include natural stone, mosaic patterns, mosaics, and the more conventional clay tile. Because they are hardy, simple to clean, and require little upkeep, ceramic tile floors are ideal for virtually any residential setting. Tile is available in a wide variety of sizes and shapes, providing homeowners with an almost infinite number of design options when arranging the layout of their new tile floor. Ideas for Tiling the Floor When it comes to selecting tile for your flooring, you have a few different options. You have the option of purchasing a tile floor with your own unique design, locating tile in a store in your area, or using tile samples.
  Each approach comes with its own set of benefits as well as potential drawbacks. If you are looking for something that is truly one of a kind, the best alternative is to have tile specially made for you. These tiles are available in a wide range of dimensions, contours, and hues. Tile samples are a great option to go with if you don’t have enough time to carefully lay out your complete floor before placing your order. Samples of these tiles can frequently be obtained free of charge from the retail establishments that sell them. You may get a good idea of how the final product will look by looking at these samples. Tile installation might seem like it would be a challenging task, but if you have the correct equipment, you’ll find that it’s more simpler than you anticipated. First things first, prepare all of the necessary supplies. You are going to require some sandpaper, tile glue and grout, a tile saw, a spade bit, a hammer, a level, a miter box, and a trowel. You need to make sure that you put aside enough money to buy a few other things, such as sealers, grouts, caulk, and cleaners. This is another thing that you need to make sure you do. It is strongly suggested that you begin by taking the dimensions of the room and sketching down the plan for the work you want done. Following the completion of the measurements, you should pick the location of each tile. To prevent the tiles from cracking, spacers should be placed between them. Before you put the tiles, use the spacers to maintain them in the correct alignment. After that, cut the tiles to the appropriate size so that they may be used together. After the tiles have been trimmed to the appropriate size, you should remeasure and then mark their locations.
  Take off the spacers, and then proceed to lay down the first row. You will need to continue placing tiles and measuring until your floor is finished. After applying grout across the entirety of the floor, it is given ample time to dry entirely. Sealer should be applied to the floor after it has had time to dry. Tile floors protected by sealers are more resistant to water damage and stains. Don’t forget to add the finishing touches of decoration! You can use tiles to fill up gaps or you can use tiles of varying sizes to create a pattern that looks like a mosaic. Altering the appearance of your floor by installing decorative tiles or other accents is one option for doing so.


Your comment submitted.